Hiking Mount Rinjani, Lombok | My Tips + Route Map!
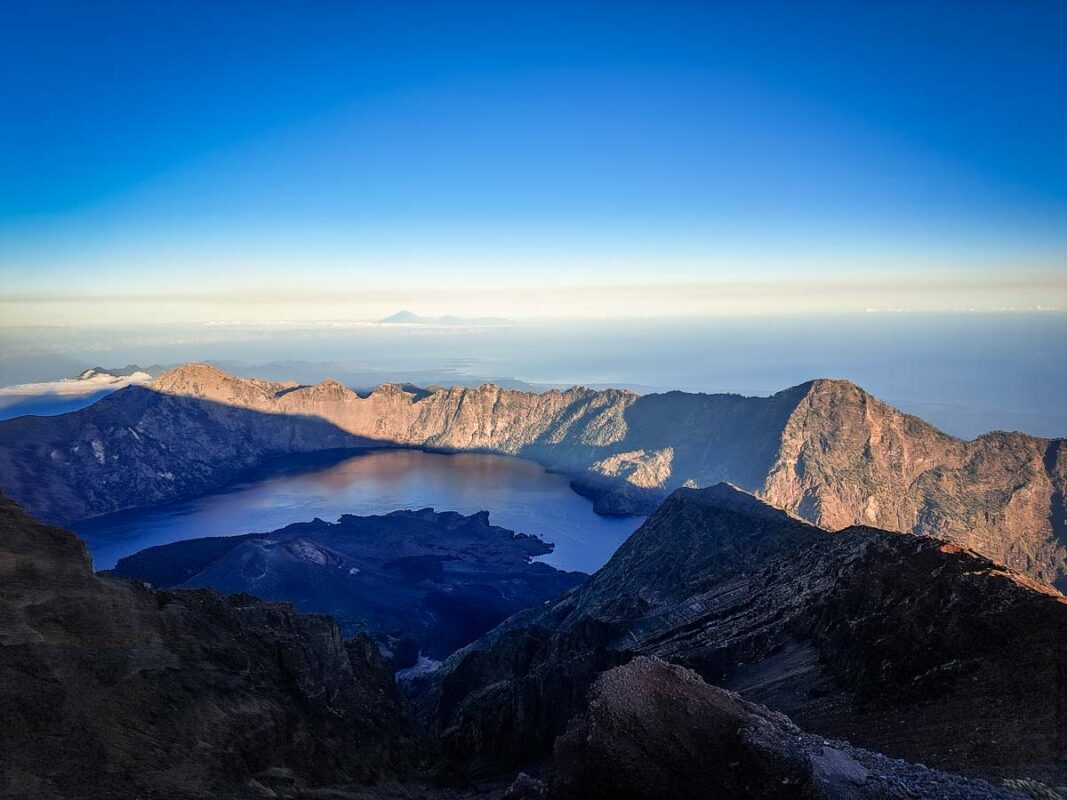
Mount Rinjani is a 3,726-meter-high (active) volcano on the island of Lombok, Indonesia. It’s known for its stunning caldera lake, Segara Anak, and for being the second-highest volcano in Indonesia
Hiking Rinjani was a lot harder than I thought it would be, but also one of the best summit hikes I’ve ever done
I recently did the 2-day / 1-night summit trek from Sembalun, but there are 3 and 4 day options as well – I’ll explain the differences later on.
If you’re heading to Lombok, or the Gili Islands (and up for an adventure..) then I %100 recommend tackling Rinjani
Here’s everything you need to know, without sifting through a bunch of hype and generic travel advice. I’ll also share my lessons learned, as well as which operator I recommend booking with.

Table of Contents
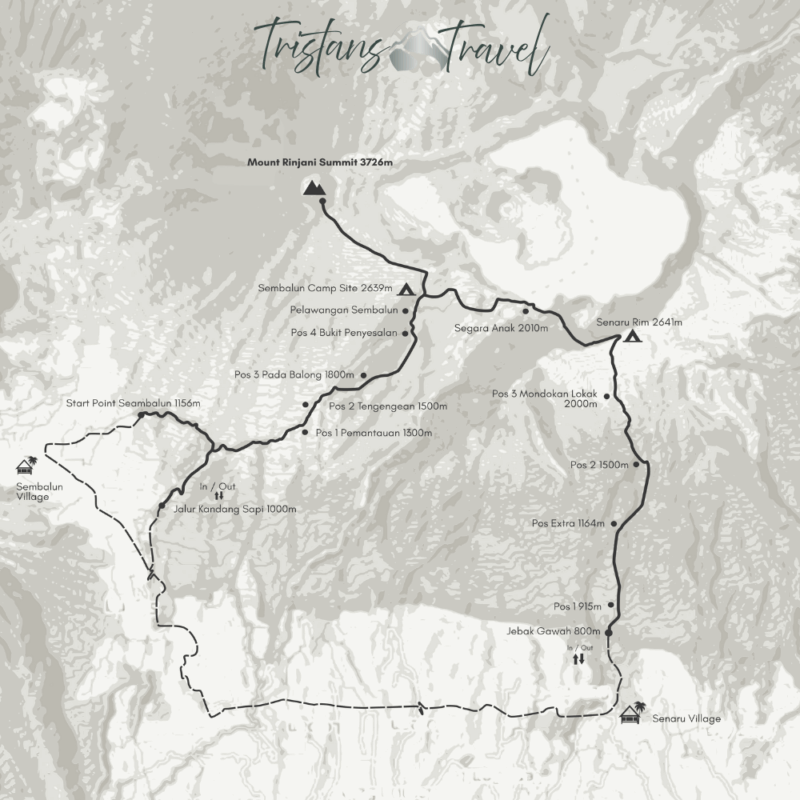
The Different Route Options
Rinjani isn’t a single trail; it’s a mountain with multiple entry points and trekking styles. Choosing the right route can change your experience entirely, so here’s a simple breakdown.
In total there are about 7 different options (offered by most trekking companies) however 3 are the most popular. These are;
- 2 Days 1 Night Sembalun Summit Hike
- 3 Day 2 Nights Senaru Hike
- 4 Days 3 Nights Circuit
2 Days 1 Night Sembalun Summit Hike (what I Did)

This is the most common choice for those short on time or who want the summit sunrise. You start higher up, which means less overall elevation gain, but the pace is relentless.
You’ll spend the first day climbing to the crater rim and camping there, then wake extremely early to tackle the summit before descending all the way back down.
Day 1 is hot and grueling, plotting up hill for 8 hours. Gaining 1600m of elevation in just 9km. Day two on the other hand is perhaps easier? Mostly downhill – but you’ll be on your feet for 12 hours and cover ~19km.
The physical demand is high, especially on the descent, but it delivers the sunrise experience without taking several days off your holiday.
Recommendation: If you’re fit and on limited time, then this is the option for you.
3 Day 2 Nights Senaru Hike
This route is slower and less punishing day-to-day.
The first day is the same, but on day two you’ll summit, then head down to the crater lake before setting up camp on the Senaru side. Day 3 is an easy retreat down to the Senaru Gate.
It spreads the effort over a longer period, giving you the chance to experience more of Rinjani’s landscape. But it requires extra stamina and mental endurance. You also spend two nights on the mountain, which gives more time to rest and recover.
4 Days 3 Nights Circuit
This is the longest route that combines the highlights of the Sembalun and Senaru approaches. You reach the summit, explore the crater lake, and cross multiple rim points.
The route is deeply engaging, but also the most physically and mentally demanding. It’s a serious commitment and works best for experienced hikers or those with extra time to spare.
My suggestion is to pick 2 days, 1 night if your main goal is the summit and you have limited time.
Choose 3 days 2 nights if you want a more measured climb with extra views 4 days 3 nights is best if you want the complete Rinjani experience and want to take it a bit easier physically.
My Experience, Hiking the 2 Days 1 Night Sembalun Route
I only had a couple of weeks in Lombok, so wanted to get Rinjani done, without spending too much time on the mountain (and away from the beaches that lombok is famous for).
The 2 Day trek was the perfect option, though it meant the hiking would be more strenuous.
Day 0: Getting to Rinjani
What they don’t tell you (or maybe they do but I clearly missed it) is the trip actually starts the day before.
I was staying in Kuta Beach, on the south of Lombok. They arranged a driver to collect me at 3pm and take me up north to Senaru, where the trekking company’s guest house was located.
It was a deceptively long 3.5 hr drive from Kuta, and in hindsight it would have made far more sense to have gone straight to Rinjani from the Gilis (only an hours drive) and then down to Kuta afterwards.
Arriving at the Guesthouse we met the other trekkers that formed part of our crew, and out guides for the next day. In total there were 8 tourists and 2 guides, so we split into two groups of 4 for the trek. The guides gave us our briefing, we had dinner, and got to bed nice and early to start the next day at 630am sharp.
Tip: Make sure you get out enough cash before you leave to pay for the trek, as most operators want cash and there are no nearby ATMs in senaru/sembalun
Day 1: Trek From Sembalun

Starting in Sembalun, I immediately realized this wasn’t going to be a gentle stroll. The first day is a continuous uphill climb through open grasslands. There’s very little shade, so the sun hits you directly, and even a moderate pace feels relentless.
You’ll pass through four ‘positions’ which are essentially rest points with shelter on the way up. At Position-2 we stopped for lunch (which the porters prepared).
The final stretch to the crater rim is steep, loose, and physically demanding. Each step feels heavier than the last.
When we reached the rim, I felt an immediate sense of relief. But there was little time to linger, because we had to set up camp and prepare for the next day’s summit push.
The heat is your enemy here
Tip: wear light, breathable clothing and plenty of protection from the sun.
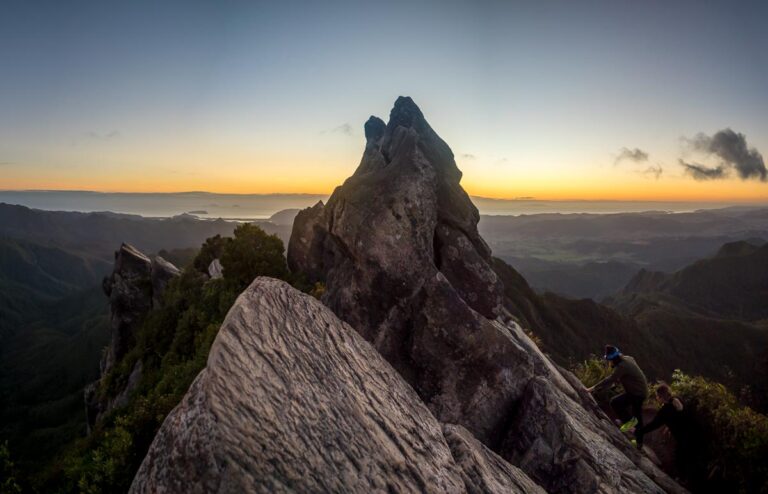
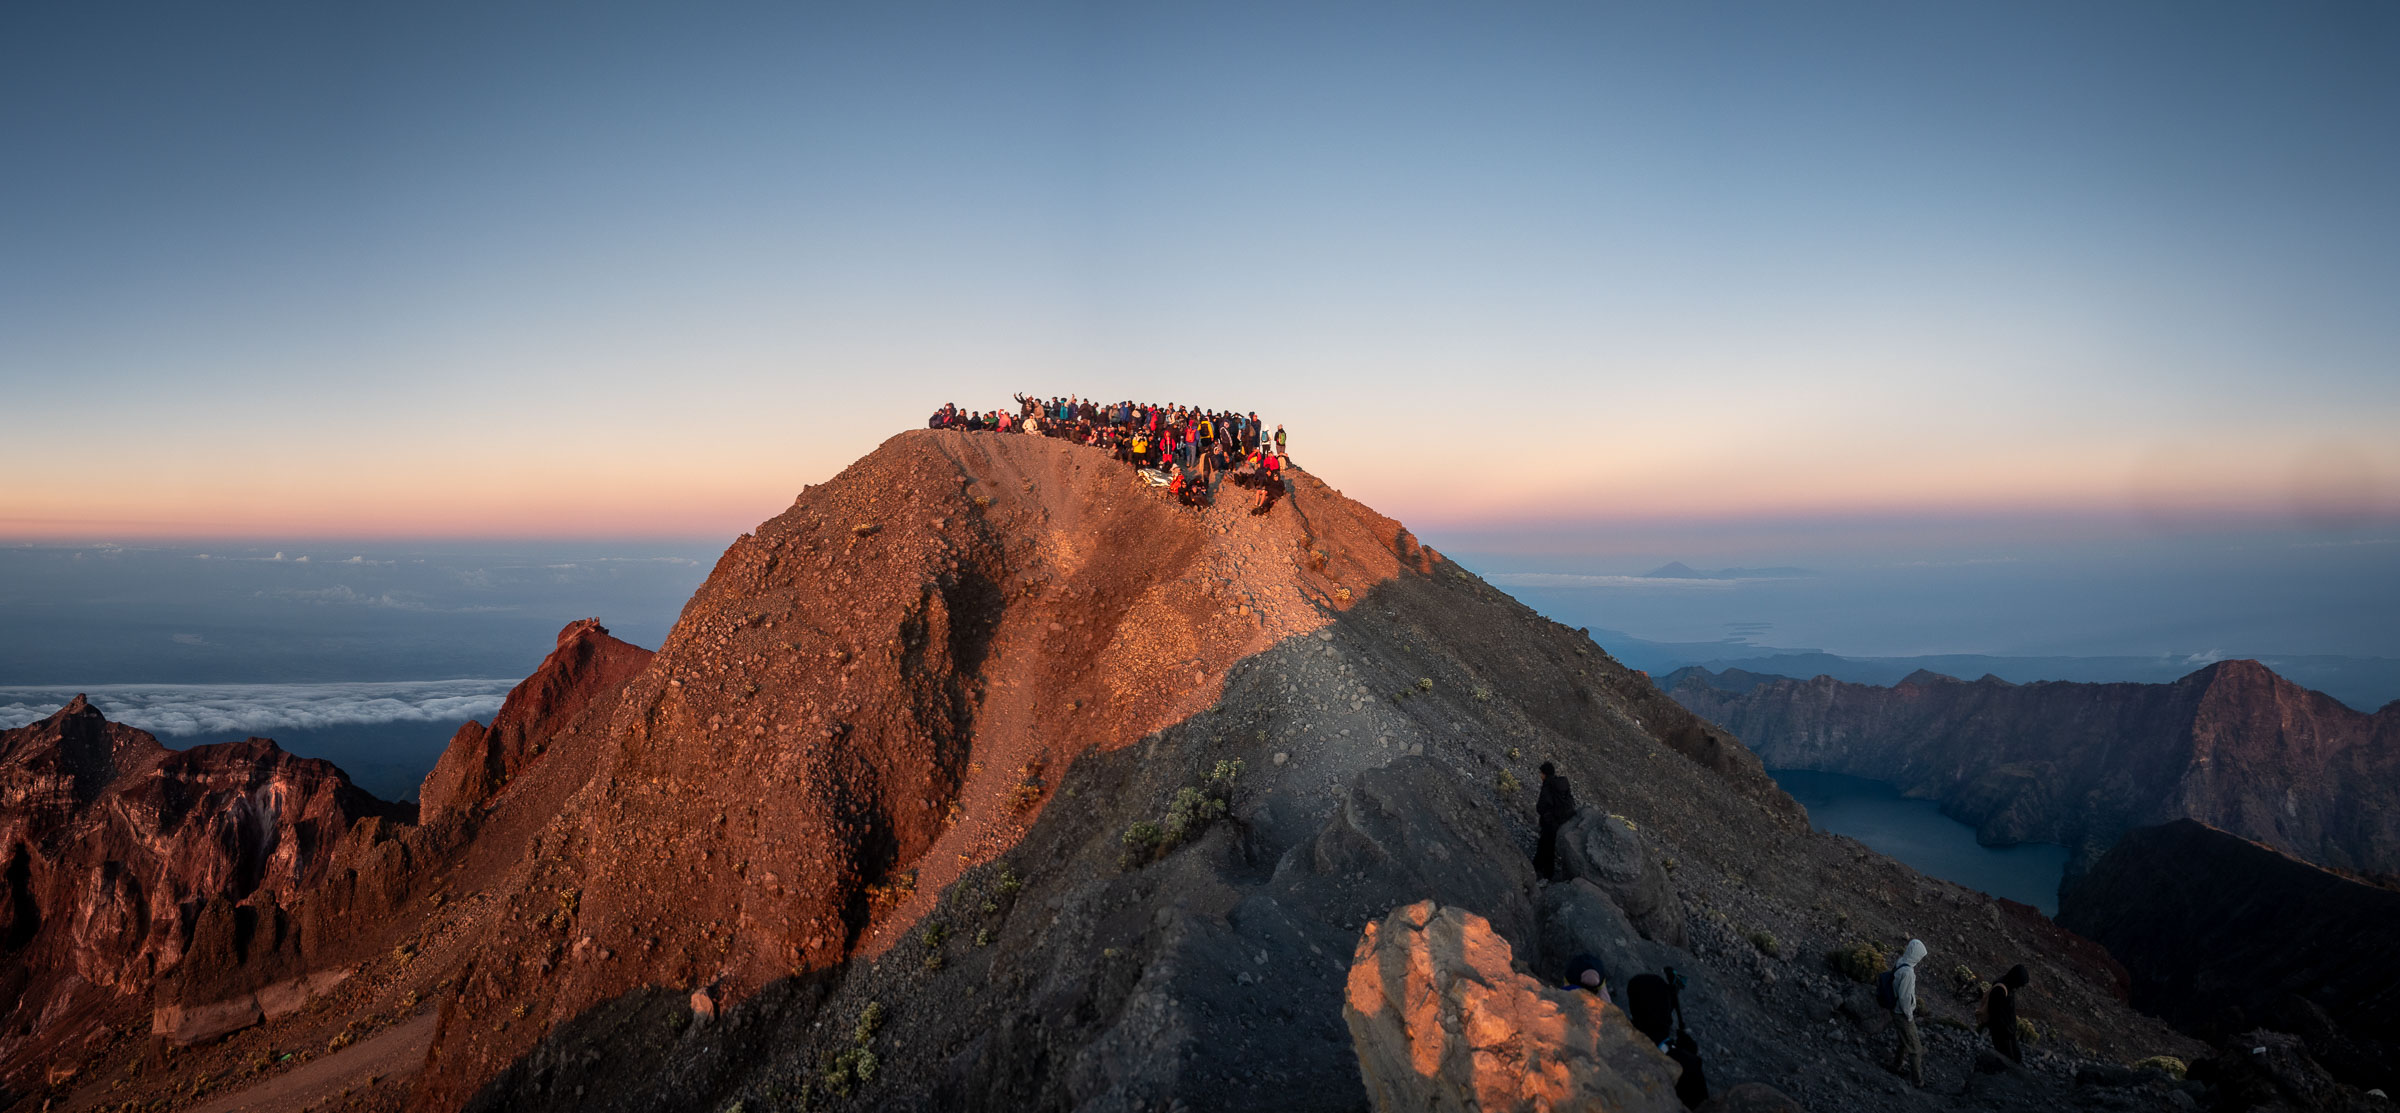
Day 2: The Summit
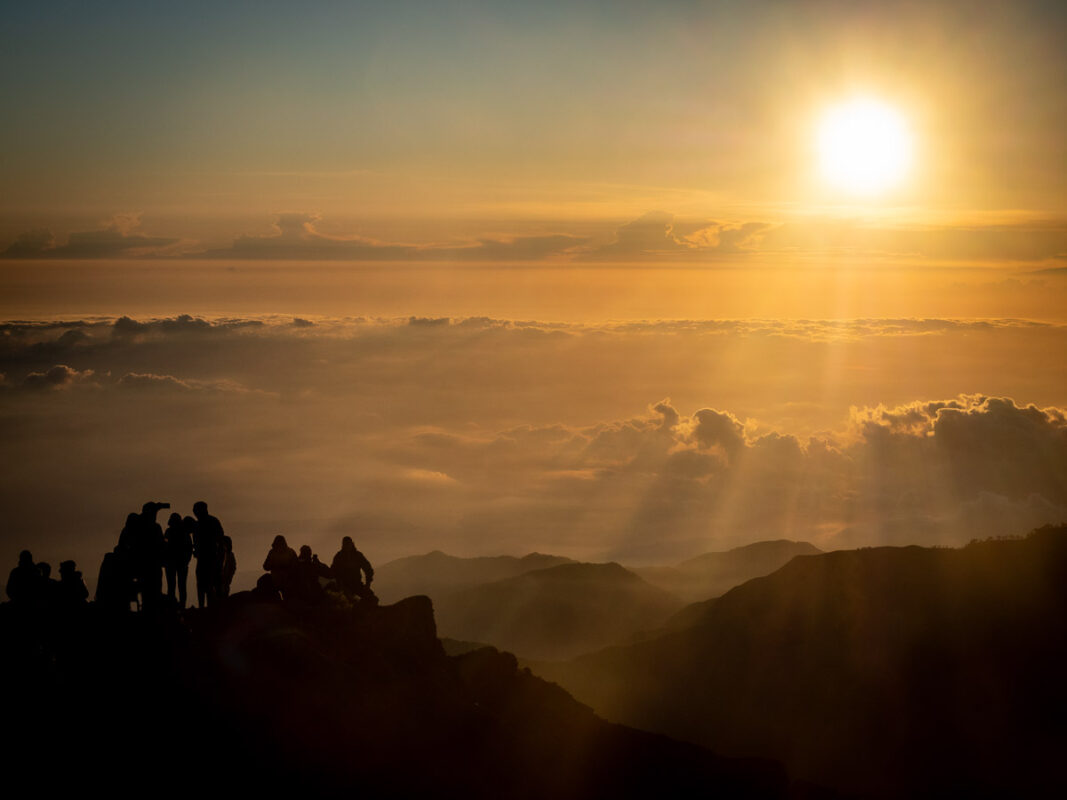
Summit day began for us at 2 a.m. With headlamps on, we ascended through volcanic scree. We reached the summit just as the sun rose over the horizon, exhausted and in awe.
It was about 3 hours to the summit, and then and hour (maybe longer) back down to base camp – 10km all up.
And that’s before breakfast!
The Decent.
Descending is deceptively brutal. Gravity is no friend to knees and thighs, and the route back to Sembalun feels much longer after summit day.
While the way down to basecamp was slick with scree, it’s manageable once you figure out the ‘scree-running’ technique.
The trail down from the crater rim to the trailhead is worse.
It’s slick with dust and fine sand, and lacking any moisture to hold the terrain together. Everyone falls over, even the most adept locals!
Use trekking poles if you have them, take regular breaks, and don’t underestimate the wear on your body. Trial shoes will pay dividends here over regular sneakers.
Getting There
As mentioned earlier, operators handle transfers from your accommodation anywhere in Lombok, which is convenient because the trailheads aren’t exactly central. I was staying in Kuta, Lombok, and the ride to Sembalun took around three hours.
You’ll pay an extra $20 USD (roughly) for the transfer, or ask your company about car-pooling with others and they may waive the fee (what i did).
If you’re coming from Bali, the typical route is a fast boat to Bangsal or Senggigi, then an inland drive to Sembalun or Senaru. Roads closer to the mountains can be uneven and winding, so allow extra time in case of delays.
The drive from Bangsal is only an hour so I’d recommend that
The drive from Lombok International Airport is around 3 hours so a good option if you’re coming from overseas, but if you’re coming from Bali you’re actually better to take the ferry
It’s worth noting that Sembalun is higher than Senaru, which reduces the overall elevation you have to climb. But it also exposes you to more sun early on. Plan your arrival to get a good night’s sleep before the trek. Fatigue before the first day will make the climb significantly harder.
Costs and What’s Included
For the 2-day 1-night summit trek via Sembalun, prices typically range from IDR 2,850,000 ($174.21) to IDR 6,440,000 ($393.72) per person, depending on the operator and inclusions.
Here’s a breakdown of the costs and what to expect.
Trekking Rinjani Adventures
- Cost: IDR 2,850,000 per person
Inclusions:
- Guides and porters: Professional English-speaking guide and experienced local porters
- Transportation: Pick-up and drop-off service from Mataram, Senggigi, or Bangsal
- Accommodation: 1-night hotel transit before the trek
- Meals: All meals during the trek (breakfast, lunch, dinner)
- Camping Gear: Tent, sleeping bag, mattress
- Permits: National Park entry fee and trekking permit
Exclusions:
- Personal expenses
- Tips for guides and porters
- Personal trekking gear
- Personal insurance
Visit the Trekking Rinjani Adventures website for more information.
Rinjani Adventure Tours
- Cost: Approximately IDR 4,086,750.28 ($250) per person
Inclusions:
- Guides & Porters: Licensed mountain guide and local porters
- Camping Equipment: Tent, sleeping bags, bed mats, toilet tent, pillow
- Meals: All meals on the mountain trek plus drinking water
- Transportation: Air-conditioned vehicle for pick-up from various locations in Lombok
- Accommodation: Pre-trek hotel stay in Sembalun
- Park Fees: National Park Gunung Rinjani entrance fee
Exclusions:
- Personal expenses
- Tipping for the guide and porter
Check out Rinjani Volcano Adventure’s website for more info.
Who I Hiked With
I went with Rinjani Trekking Adventure, and everything from gear to food to guide professionalism was solid. Guides were informative and genuinely supportive, which makes a huge difference when you’re exhausted and need assistance with any concerns that come up.
Rinjani Volcano Tour is praised for its eco-conscious practices and well-trained guides. Both provide transparent pricing and include services without hidden extras.
What to Watch Out for
- Altitude:
Not extreme, but can cause light-headedness or shortness of breath, particularly during the summit climb. You’ll be back down quickly and altitude medication (like Diamox) is not required. - Rubbish:
Choose operators committed to leaving no trace. - Weather:
Dry season, between May to October, offers the safest and clearest conditions. Rain makes trails even more slippery, muddy, and camping uncomfortable. You’ll also be less likely to get an amazing sun rise, which for me was the highlight of the trip, so i’d avoid wet season if possible.
Most companies stop opperating during wet season and The Rinjani National Park actually closes to climbers during the worst part of this period (usually from January to March) to ensure safety and allow for ecosystem recovery. While some companies may offer treks “under the radar,” this is dangerous and can leave you without official support in an emergency.