Brewster Glacier Hike (1 Day vs. Overnight)
Brewster Glacier is the most accessible glacier in the Mount Aspiring National Park as you can get from carpark to the glacier in a matter of hours (although it’s no walk in the park!)
The Brewster Hut Hike, and on to Brewster Glacier, can be done in a single day or overnight based on your timeline and fitness level. It’s a 1:3 gradient from the carpark to the hut and you’ll ascend 1000m in only 3km. From the hut, it’s one more push up to the ridgeline and and then a more mellow traverse across to the glacier, where you can see the ice up close.
In this post, I’ll share my experience of hiking the entire trail in one day, and give some tips if you plan on attempting it overnight too!
You can check out my other New Zealand Hiking Guides Here

Table of Contents
Brewster Hut and Glacier Hike Key Facts
- Starts from the Fantail Falls carpark
- Medium to hard trekking. Requires a good level of fitness, hiking experience, and some basic navigation skills.
- Hiking to the Brewster Hut covers 2.8 km one way, with an elevation gain of 965 m
- Tramping from the hut to the glaciers and lakes takes another about 1.5 to 2 hours from the hut.
- This hike is very weather-dependent. You’ll need snow and avalanche training if you want to attempt this in winter.
- Always check the DOC Website for lastest updates before you go
Brewster Glacier Hike Options

Option 1: Day Trip It
If you’re looking to challenge yourself, you can do the hike in a single day. You’ll cover about 13.3 km and 1468 m of elevation gain over the course of 8 hours. Its a BIG day, and you’ll need to prepare well with plenty of nutrition and hydration.
It’s ideal in that you don’t have to carry a heavy backpack or pay for the hut. You also get to see jaw-dropping highlights in different light conditions, as the sun moves across the sky.
This option is time-constrained, though. It requires you to have an early start and a late finish to avoid hiking in the dark. You’ll also have less time to explore the area and relax.
Option 2: Overnight at Brewster Hut
Spending the night gives you more time to enjoy the scenery and rest after a physically demanding trek. If you’re looking to acquaint yourself with fellow hikers and catch a sunrise and sunset in an absolutely stunning location
But overnighting also means you’ll have to carry a heavier backpack filled with all your essentials. This can be strenuous as you ascend to the hut and can be even worse on the way down, when your legs are shot.
If you do overnight it, i’d suggest hiking to Brewster Hut in the afternoon of the first day, then tackle the glacier first thing in the morning. You can catch your breath and have some lunch at the hut again before making your way back down to the carpark.
Trip Difficulty and Fitness Requirements
Hiking to the glacier is a physically demanding task. You’ll cross an unbridged (sometimes knee-deep and swift) river, and navigate rugged sections, all the while being exposed to strong winds and sudden temperature changes.
This requires a good level of fitness, hiking experience, and navigation skills to complete it safely and enjoyably.
The hike to the hut is the most challenging. Not only did is it a steep ascent, but you also need to deal with roots, mud, loose rocks, and fallen trees.
Warning: Be mindful of the descent which is arguably harder than the way up when your legs are tired. It also can be sketchy and dangerous as you go down a steep gully to reach the glacier. Don’t try and attempt the glacier hike in unfavorable weather!
Trail Description (Our Experience doing the Brewster Glacier Hike in a Day)
Setting Out: Fantail Falls Carpark
Fantail Falls carpark (view on maps) is the starting point, about a 70-minute drive from Wanaka. It’s a large gravel area located on the Haast Highway next to the Haast River. It can get extremely busy, especially during summer, so you might want to park in such a way that prevents your car from getting backed into or blocked in.
There is a signpost with a map, some information about the hike, and a toilet. There is also a short walk to the Fantail Falls. A small but pretty waterfall worth a visit.
We checked our gear, filled our water bottles, and put on our sunscreen. After leaving a note on our car dashboard with our intentions, we were ready to start tramping.
River Crossing

The first obstacle was the river crossing. Though it wasn’t as much of a challenge as is noted on other peoples accounts, this was probably due to the dry summer and lack of rain. The rapids were gentle and moderately shallow, but still knee-deep. After heavy rain the crossing could be quite challenging..
The trial starts on the far side of the river as marked with a jumbo size orange trail market.
Note: where the marker is is a big step up a bank that practically requires ladder access. There’s an easier access point another 20m or so left up the river!
Now, Up. Up Through The Bush
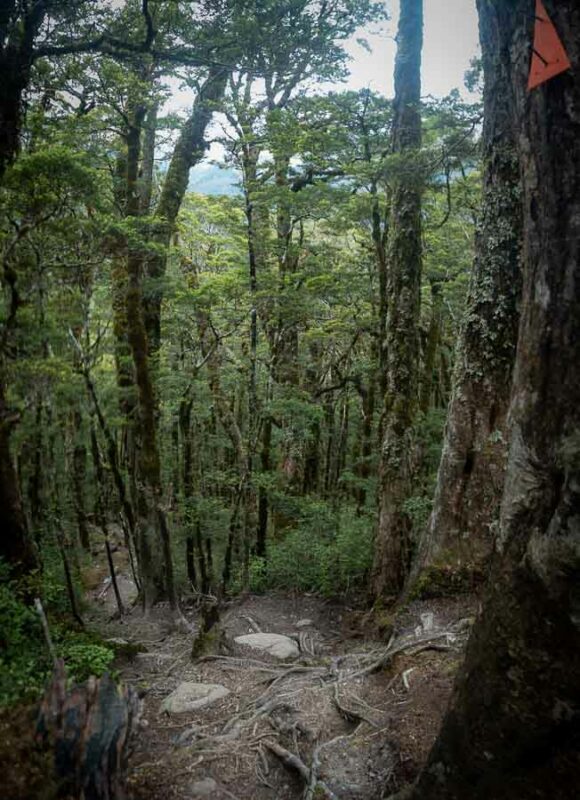
Navigating the dense beech forest and rocky slopes was the hardest part of the trip for me (and for my partner, the same sections but going down!). It was relentless!!
The track was well-marked and there wasn’t much bush bashing to do, but we still had to deal with roots, mud, loose rocks, and fallen trees.
The saving grace here was the shelter provided by the bush, otherwise it would have been very hot work!
Out from the bushline and on to Brewster Hut
The views open up when you pop above the bushline and the heat turns up a few notches. This section was more rocky, with a lot more exposure to wind, requiring us to add a layer.
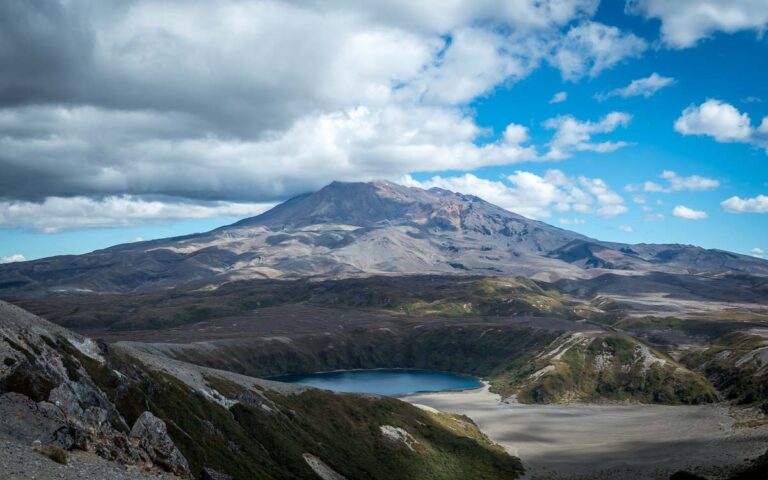
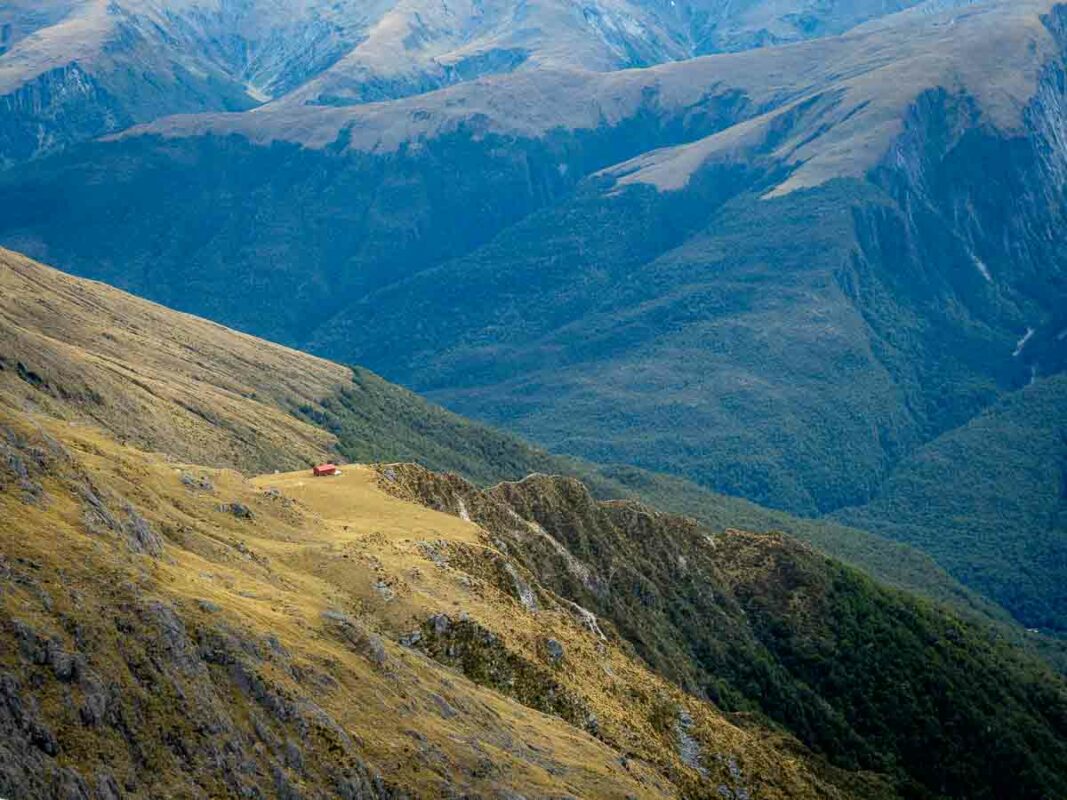
After a good 2 and a half hours of walking, we arrived at the hut perched on a ridge overlooking the Haast River valley and the Southern Alps. We also got a clearer view of Mount Brewster, Mount Armstrong, the unnamed peak at 2023m, and the Brewster Glacier and its river at a far distance.
The hut was relatively small and cozy, with picnic tables, a water tank, and a toilet outside.
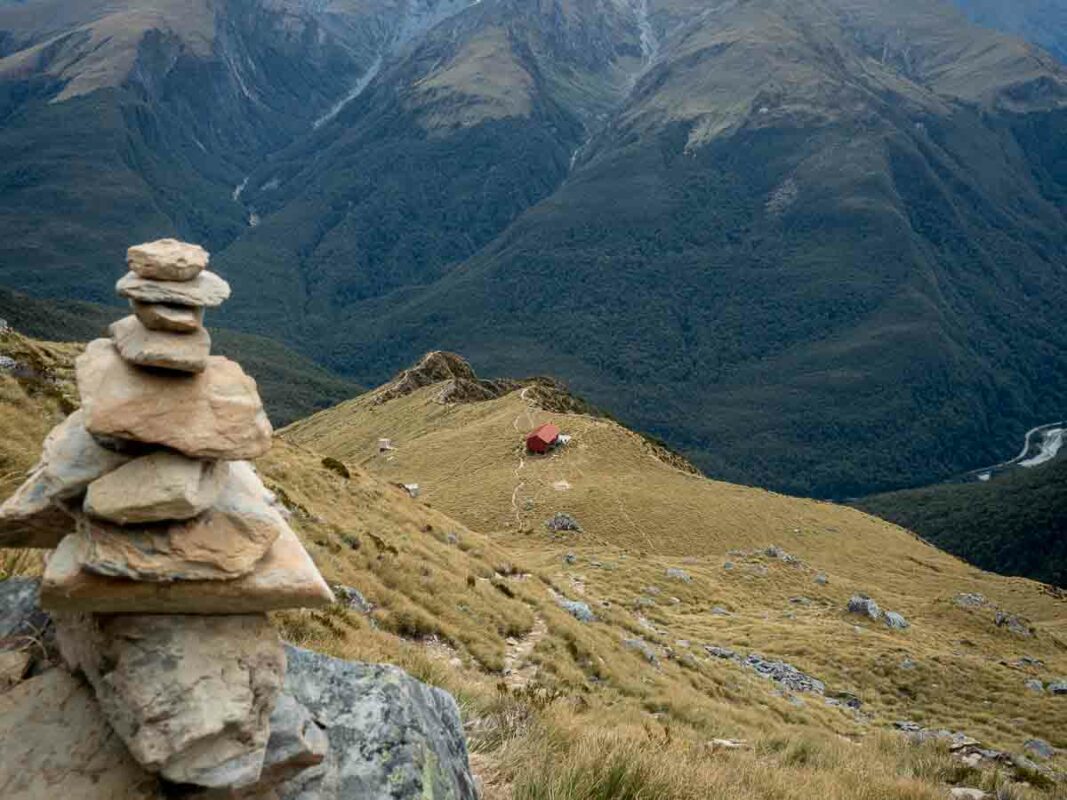
We had made it just in time for lunch, so we ate while enjoying the views and exchanging pleasantries with other hikers who were staying overnight. They also explained us about the terrain’s condition and how to navigate by cairns over the ruggeder terrain to the glacier.
Brewster Hut To the Ridge (almost)
First, you have to pass a reasonably new-looking DOC sign saying “Track Ends Here” which it clearly doesn’t, but this kinda signals tht you’ll have to do your own navigation from now on;
The first push is probably the shortest and most scenic section. We followed a zig-zagging gravel path up towards the ridge line from the hut to a viewpoint.
From here it’s a scramble across the mountainside to get left a couple of kilometers to where the glacier is.
That’s right, you’ve done all the uphill!!
Here you have to navigate by cairns (the piles of stacked rocks) rather than trail markers. These are hard to see, and often take you in contradictory directions so use some judgement.
The terrain is alpine tussock and scree, with some sections of snow and ice if you go in the shoulder seasons. We were in the middle of summer but still dealt with strong winds coupled with low visibility.
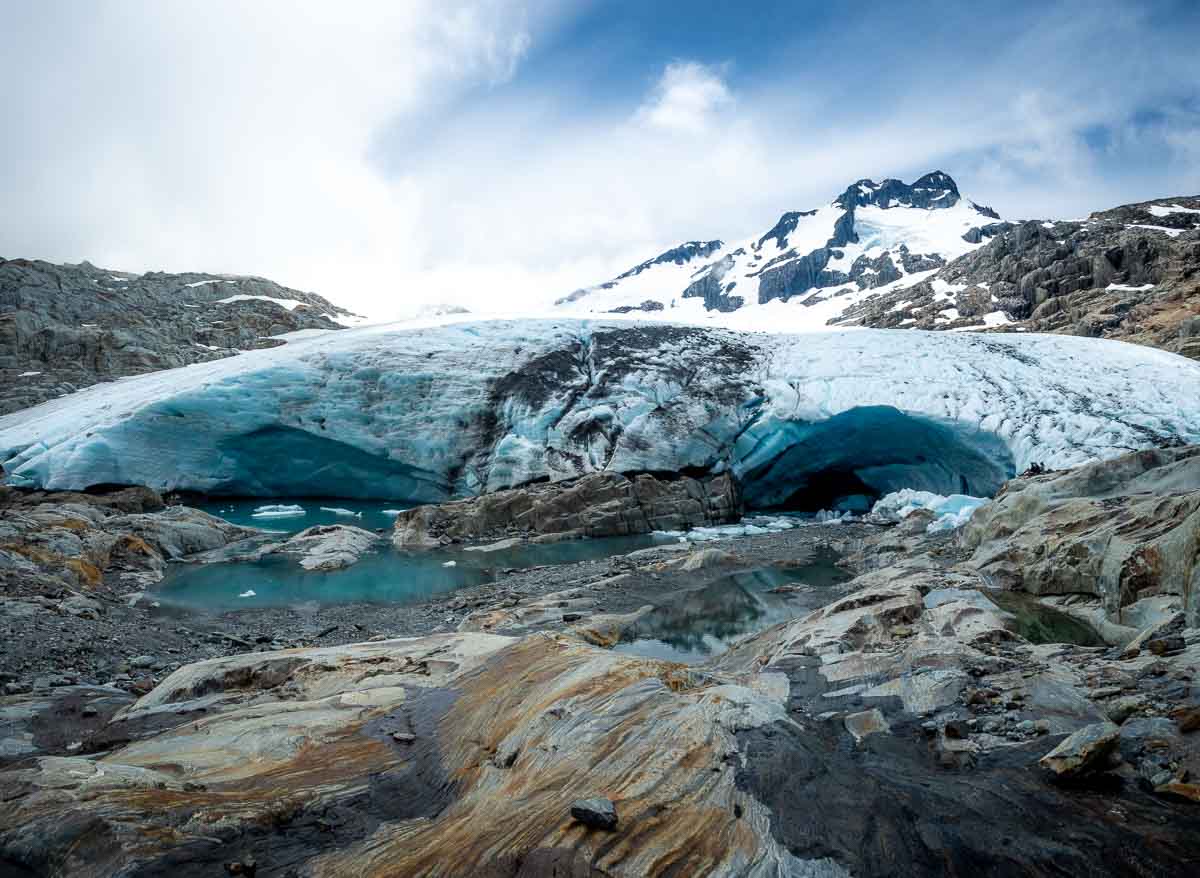
Eventually you’ll get to a viewpoint, we were presented with massive and majestic ice sheets and turquoise and sparkling waters. The contrast between the white and the blue was stunning. Enough to leave you speechless. After a few minutes of rest, we made our way down the rocks to the glacier and the lakes.


A final descent down to Brewster Glacier
As you might expect, this is the highlight of the entire trip.
It took us about an 20min to get from the view point to onto the glacier. Mainly because it’s the most difficult and dangerous part, with some sections of scrambling and sliding. I was ecstatic to see and touch the glaciers and the lakes up close. We walked on the glacier to see the crevasses and the icefall, making sure to follow the safe route and avoid any unstable sections.
Returning back
Though exciting on every level, I was glad to have completed the hike. It was an exhausting feat.
On our way back, we climbed up the gully, followed the ridge, and descended to the hut. We passed through the forest, across the river, and reached the carpark. Having endured the intensity of tramping to the glaciers, I found this section a lot easier.
We got in our car and drove back to Wanaka.
How To Get To The Brewster Glacier Hike Trailhead
By car
Drive to the carpark and leave your vehicle there for free. There is no security or surveillance, so you should lock your car and leave nothing valuable inside.
By bus
You can board a bus to the starting point by making use of services from notable operators servicing the nearby areas.
Extending The Trail From Brewster Hut to Brewster Glacier
Unnamed Peak at 2023m
This option is the easier and shorter option, but still challenging in its own way. You’ll follow a spur from the hut to the summit, with an elevation gain of 573 m over a 2 km return. Expect to take about 2 ½ hours.
Mount Armstrong at 2174m
Traveling from Mount Armstrong is harder and longer and might appear like a near-impossible task. You’ll follow a ridge line from the hut to the summit, with an elevation gain of 715 m in about 2 to 3 hours. The trail comprises alpine tussock and scree, with some sections of scrambling and climbing, and requires good balance and route-finding skills.
FAQ Brewster Hut
Can you tent at Brewster Hut?
You can tent at Brewster Hut. There is a flat and grassy area where you can pitch your tent.
What is the elevation gain of Brewster Hut?
The elevation gain of Brewster Hut is 965 m over 2.8 km one way. To get all the way from the carpark to the glacier it’s approximately 1400m of elevation gain!
How much does Brewster Hut cost?
Here’s what you can expect to pay if you decide to overnight:
– Adult (18+ years): $30 per night
– Youth (11–17 years): $15 per night
– Child/Infant: (0–10 years): free
New Zealand Travel Planning Cheatsheet
🚑 Should I buy travel insurance for New Zealand?
100% YES! — New Zealand has “free” healthcare but it’s only for citizens. Tourists need travel insurance in case anything happens on your visit. Also be aware many policies won’t cover hiking as it’s a high risk activity! (that’s right, check the t&c’s on your complimentary credit card insurance)
I highly recommend World Nomads as you can get specific add-ons for the crazy activities you’re doing – and starts at just $7 a day!
🚙 Do you need to rent a car in New Zealand?
I’d reccommend it — Renting a car isn’t a necessity to get around in NZ with plenty of domestical flights and intercity busses. But, If you want to go on road trips or adventures outside of the major cities, you’ll need to rent a car. I always use Discover Cars for my rental bookings (it’s like Skyscanner for cars!) as they compare all availible providers for the best price.
Better yet, rent a van! This is the most cost effective way to see Aotearoa as you’re getting your transport and accomodation together as one! (Checkout my reccommended van rentals here)
📲 Will my phone work in New Zealand?
You’ll need to get a local SIM card when in New Zealand, which is super easy and doesn’t require ID. Spark generally has the best coverage and you can get pre-paid plans for around $30 for 30 days.
Alternativly – I now always use Airalo when travelling. This app generates an eSIM that will work the moment you touch down. It costs slightly more than a local SIM but the convenience is well worth it. You can signup here
💸How do you pay for thing in New Zealand?
Cash has gone out of fashion in New Zealand, so you’ll be able to pay for almost everything with EFTPOS / Debit / Credit Card. Paywave (contactless payments) is very common, but vendors who accept American Express cards are not (so bring a backup!).
I personally use Wise for all my international money needs as they only convert the funds when you may payment and offer a much better spread (margin on the true exhange rate) than the banks do. They also provide free deibit cards for your account!
🏩 What’s the best way to book my New Zealand accommodation?
My go-to for Kiwi hotels is Booking.com. For hostels, I use Hostel World. If you want a home-y feeling, check out AirBnB.. but don’t expect prices to be that much cheaper than hotels.
✈️ What’s the best site to buy flights to New Zealand?
For finding cheap flights, I recommend Skyscanner. Once you find the flight you’re looking for, I’d then suggest booking directly with the carrier (even if it costs a few $$ more than with one of the agreggators/agencies).
💧Can you drink the water in New Zealand?
Yes — everywhere in New Zealand you can drink the tap water. If you’re out hiking you can even drink the water from mountainous rivers and streams. I recommend a Brita Water Bottle and a packet of water purificiation tablets for long hikes and backcountry camping.
🎫 Do I need a visa for New Zealand?
NZ has a ‘traditional visa’ which is a document stamped in your passport allowing you to enter and stay in New Zealand for a specified period, while an “NZeTA” (New Zealand Electronic Travel Authority) is a travel authorization that allows certain passport holders to visit New Zealand without needing a separate visa – essentially a visa waiver for eligible travelers; meaning you need a full NZ visa if you don’t qualify for an NZeTA based on your passport and travel intentions.