Hiking Mount Ruapehu: Dome Ridge, Crater Lake Views + Safety
Mount Ruapehu is not a normal day hike where you follow orange triangles to a lookout and eat your sandwich feeling heroic.
It is an active volcano. It is tapu to local iwi. The weather can turn quickly. And once you leave the ski-field infrastructure, there is no tidy marked trail holding your hand.
That is also what makes it such a memorable climb.
I hiked up from the Whakapapa side in summer, aiming for the Dome Ridge / crater lake view area. It felt more isolated than I expected. You are not really “on a track” anymore. You are picking your way through volcanic rock, checking the weather, and hoping you have not made a dumb decision.
If you get the day right, it is one of the most satisfying hikes I have done in New Zealand. If you get the day wrong, or treat it like a casual tourist walk, Ruapehu can turn on you very quickly.
Table of Contents
The Short Version
I would only climb Ruapehu in summer, in a settled weather window, with proper alpine day gear and enough navigation confidence to be comfortable off-track.
The usual Whakapapa-side goal is the Dome Ridge / crater lake view area rather than some neat signposted “summit” moment. You can start from Iwikau Village at the Whakapapa ski field, or use the Sky Waka gondola when it is running to begin higher up near Knoll Ridge.
Heads up: Before going, check the Tongariro National Park Visitor Centre, DOC’s volcanic risk page, GeoNet’s Ruapehu page, and the Sky Waka operating status if you are relying on the gondola.
Before You Start
The first thing to understand is that Ruapehu is not really a “trail” in the normal New Zealand day-walk sense. You begin with road, car park, ski lifts, buildings and gravel tracks. Then those things start fading behind you, and suddenly you are standing in a big volcanic bowl with no obvious line.
It felt properly isolated up there. Not remote in the deep backcountry sense, because the ski field is below you, but isolated in the “I have wandered off into a serious place and now I need to make good decisions” sense.
That is the part I liked most, and the part I would be most careful with.
Choose your weather window carefully. I know that sounds like generic hiking advice, but on Ruapehu it is the difference between an exciting day and a stupid one. Cloud can move over the mountain quickly, and once visibility drops, the lack of a marked track becomes a real problem.
There is a cultural layer here too. Te Ara records different pūrākau around Ruapehu, Tongariro, Taranaki and Pīhanga, and the details vary between traditions. I am not a Māori speaker and I do not want to flatten those stories into a tidy tourist paragraph, but it helps to remember that Ruapehu is a maunga with whakapapa and mana, not just a scenic pile of volcanic rock. Walk like a visitor.
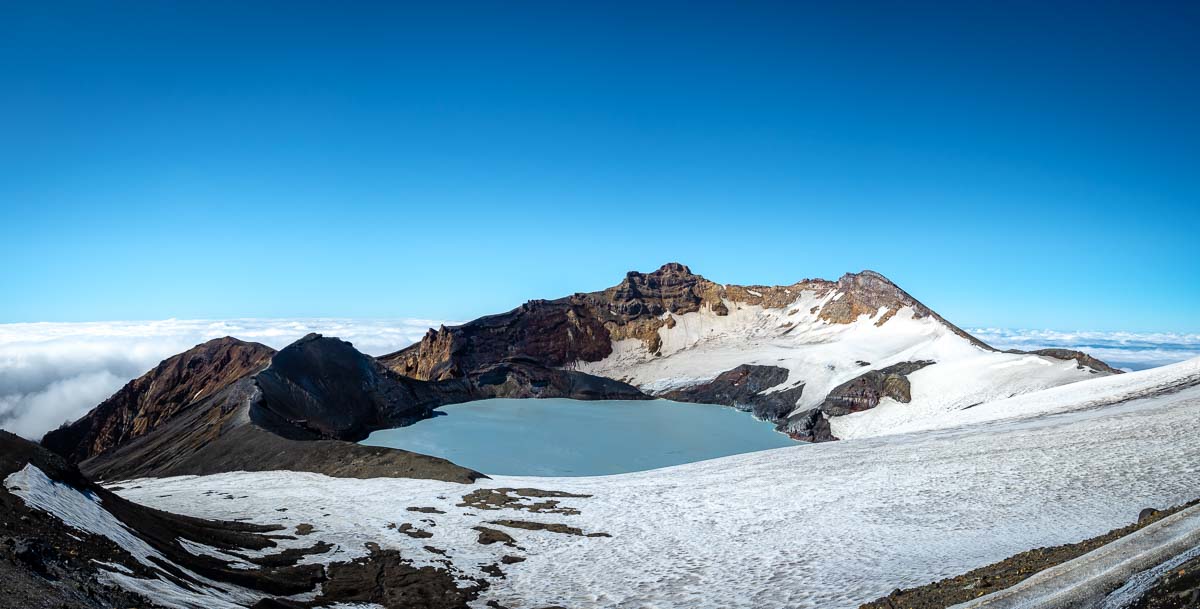
Do not make the crater lake your swimming goal. My uncle told me that when he went up as a kid on a guide trip, everyone swam in the warm crater lake water and apparently it was brilliant. Different era. These days Te Wai ā-moe / Crater Lake is highly acidic, volcanic activity is monitored closely, and DOC currently recommends not entering the area within 700 m of the centre of the lake while Ruapehu is at Volcanic Alert Level 1.
The lake is something to respect and look at from a sensible distance. It is not a hot pool.
Tip: If you want the views without committing to the full off-track climb, use the Sky Waka when it is operating and stick to the marked short walks around Knoll Ridge. That is a much cleaner option for casual visitors.
Getting to the Start
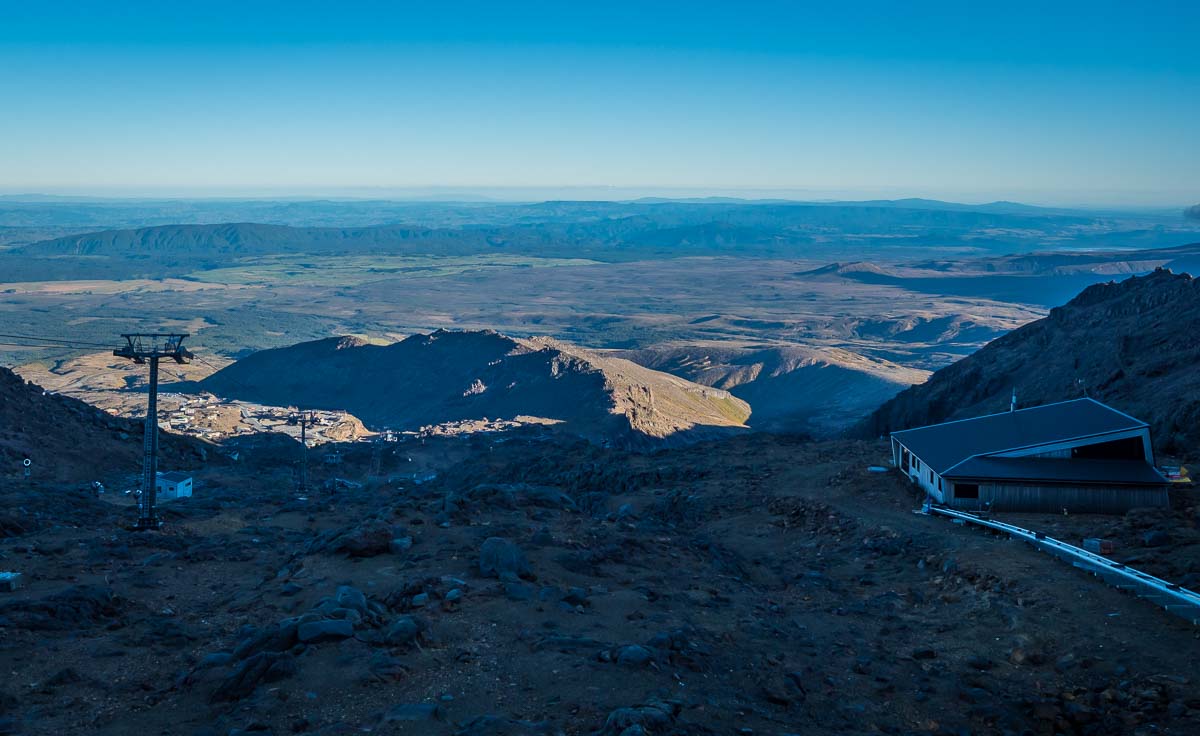
Most people approach Ruapehu from Whakapapa Village, then drive up Bruce Road to Iwikau Village at the Whakapapa ski field.
Whakapapa Village is worth a stop before you go up. The Tongariro National Park Visitor Centre is there, and this is where I would check the weather, volcanic risk, and any current access notes before committing to the climb.
If you are staying nearby, the obvious bases are Whakapapa Village, National Park Village, Ohakune or Turangi. Whakapapa is closest, National Park is practical, Ohakune has more going on, and Turangi makes sense if you are also doing Tongariro Crossing logistics.
For a normal trip, I would search Booking.com around National Park or Ohakune first, then choose based on weather flexibility rather than trying to be exactly beside the mountain.
Heads up: You really want a car for this part of the country. Public transport around the central plateau is thin, and weather windows matter. I would use Discover Cars if I needed a rental, then keep the day flexible rather than locking myself into a tight shuttle plan.
From Iwikau Village Through the Ski Field
The start is not beautiful in the classic alpine sense.
You are walking through a ski field without snow: gravel, lift pylons, service roads, volcanic rubble and bits of infrastructure that look slightly odd out of season. It is not the most romantic beginning, but I liked it. Empty ski fields have a strange end-of-the-world feeling to them.
If you walk from Iwikau Village, this lower section adds time and effort before the more interesting terrain begins. If the Sky Waka is running, it can take you from the base station at 1,630 m up to Knoll Ridge at 2,020 m, which skips a decent chunk of the slog.
I would not call the gondola cheating. It just changes the day. Walking from lower down gives you the full grind and a better sense of the mountain’s scale. Taking the gondola makes it shorter, but the upper mountain still needs respect.
The key thing is whether you are willing to turn around if the conditions start closing in.
Into the Volcanic Terrain
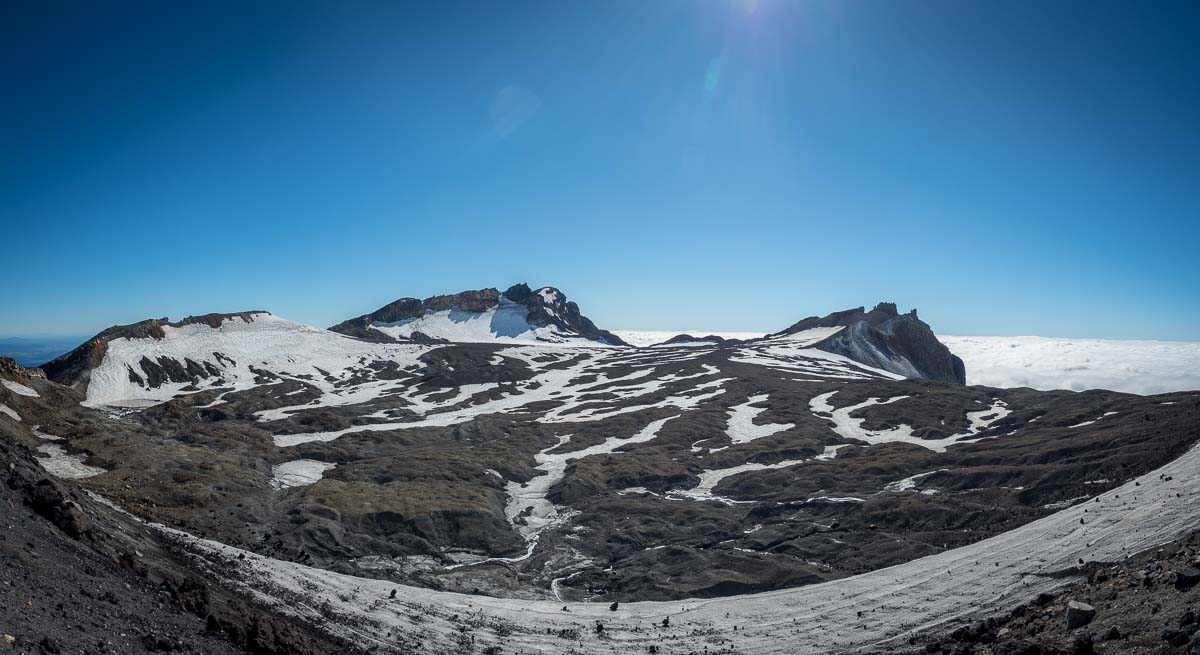
Once you get above the obvious ski-field zone, the hike becomes much more interesting.
The ground turns loose and uneven. There are ridges, rocks, patches of old snow or ice depending on the season, and lines that look promising until they suddenly do not. This is where the isolation starts to kick in.
There is no neat track telling you that you are doing well. No steady line of walkers. No little sign every few hundred metres. You are just moving through volcanic terrain, choosing the least annoying way up.
I found this satisfying in a way that more managed hikes are not. It felt like actual route-finding, not just exercise. But if you are not comfortable making decisions off-track, Ruapehu can feel unnerving pretty quickly.
The mountain does not care that it is only a day hike.
Good footwear matters here. I would not do this in casual sneakers. Trail shoes with proper grip, like Altra Lone Peaks, or light hiking boots both make sense.

Pinnacle Ridge Lookout Side Trip
If the day is clear, Pinnacle Ridge Lookout is worth considering as a side trip or even as a softer goal.
The view back across Tongariro National Park is the reason to do it. On a good day you can see Ngauruhoe, Tongariro, the central plateau and sometimes all the way toward Lake Taupo.
That said, I would not add it automatically. Ruapehu is a place where conditions should decide the plan, not your ego. If the cloud is building or you are already moving slowly, keep it simple.
This is the sort of mountain where the best decision might be “that is enough for today”.

Climbing Toward Dome Ridge
The upper climb is the part that feels most like the Ruapehu people imagine: rough, exposed in places, and full of loose volcanic rock. You may need to use your hands briefly depending on the exact line you choose. It is not technical climbing in good summer conditions, but it is also not a footpath.
I remember the air feeling sharper up there. The wind had more bite, the ground felt harsher, and everything around me looked a bit prehistoric. Very New Zealand, but not the soft brochure version.
This is where weather matters most. If cloud comes in around the ridge, the whole day changes. The route back down is not always obvious, and descending loose volcanic rock in poor visibility is exactly how a fun adventure stops being fun.
Look behind you as you climb so the descent makes sense later.
Tip: Take photos of key terrain features on the way up, not just pretty scenery. They are surprisingly useful when you are trying to reverse an unmarked route in flat light.

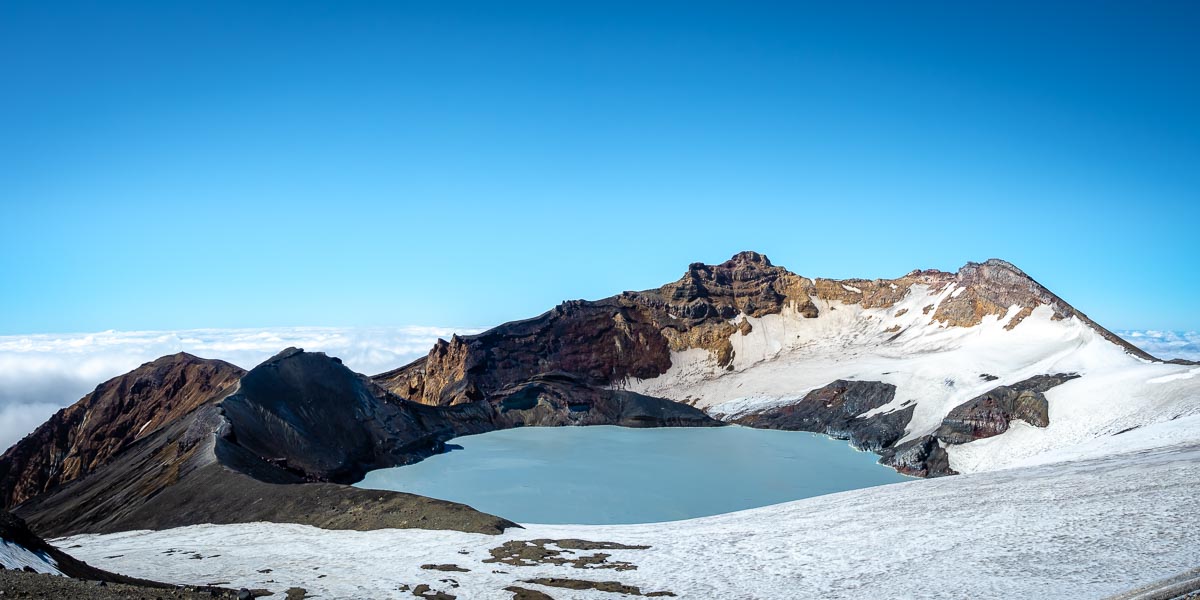
The Crater Lake View
Seeing Te Wai ā-moe / Crater Lake is the payoff.
The colour is unreal. Not “pretty lake beside a picnic spot” unreal, more “this mountain is clearly alive and maybe I should not get too comfortable” unreal.
This is where my uncle’s story kept coming back to me. He went up as a kid, everyone swam, and it sounded like one of those mad old New Zealand outdoor stories where the adults were either very relaxed or completely unhinged.
I would not even consider swimming now. Not for a second.
Current DOC guidance around Ruapehu’s volcanic risk is very clear about staying away from the crater lake area while the volcano is at Volcanic Alert Level 1. There has also been a fatal fall into Crater Lake in the past, so this is not a place to muck around for a better photo.
Enjoy the view. Have your snack. Keep a respectful distance. Then start thinking about the descent while the weather is still on your side.

The Descent
The way down is quicker, but I would not call it easy.
Loose volcanic rock is annoying on the way up and properly slippery on the way down. You can move faster, but you also make worse mistakes when you get impatient. The ski-field infrastructure feels oddly comforting when it starts to reappear.
Do not hang around too long on top if the weather is changing. Ruapehu is not a mountain where I would want to be casually wandering around late in the day with a dying phone and no visibility.
Bring a headlamp even if you plan to be back early. A Black Diamond Spot or similar is tiny insurance. Same with a warm layer. An Icebreaker BodyFit layer is exactly the sort of thing I would want in the pack.
Trekking poles are optional, but I would not laugh at anyone bringing them for the loose descent. Something like Black Diamond Trail Pro trekking poles is overkill for some New Zealand day walks. Here, I can see the point.
Not glamorous advice. Very useful advice.
What I Would Pack
This is still a day hike, but I would pack for a bigger day than the distance suggests:
- Proper trail shoes or light hiking boots with good grip
- Warm layer, rain jacket, beanie and gloves
- Sun protection, because volcanic alpine terrain gives you nowhere to hide
- Offline map or GPS route, plus a battery bank
- Headlamp, even if you plan to finish early
- Plenty of water and snacks
- First aid kit and ideally a PLB if you are going beyond the marked visitor areas
- Microspikes or winter gear only if you know how to use them and conditions require it
I would also take more food than you think you need. Loose volcanic climbing makes snacks feel more important than usual.
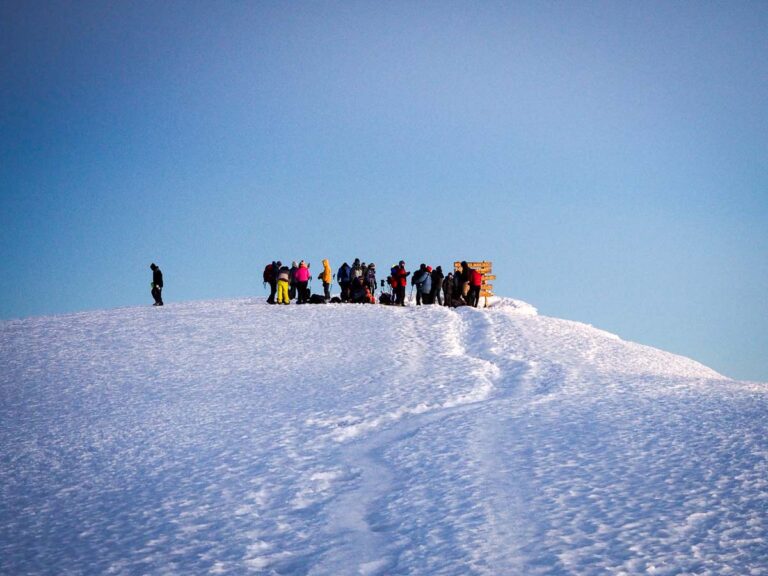
Winter Hiking
In winter, this becomes a different activity.
Snow, ice, avalanche terrain, whiteout risk and short daylight hours change the entire equation. I would not recommend an unguided winter climb unless you have mountaineering experience, avalanche awareness and the right gear.
If you want a winter Ruapehu experience, go skiing, ride the gondola if operating, or book with someone qualified. Do not take a summer hiking post and try to force it into July.
Ruapehu vs Tongariro Crossing
The Tongariro Alpine Crossing is the better choice if you want a famous, more obvious day walk with a clear route and shuttle logistics.
Ruapehu is better if you want something lonelier, rougher and more self-directed. It feels less packaged: fewer people, fewer signs, fewer reassuring little markers telling you what to do next.
That is the appeal.
It is also the risk. Same mountain, same reason.
If someone asked me which one to do on a first New Zealand hiking trip, I would probably say Tongariro Crossing. With solid hiking experience, a stable forecast and a taste for a wilder day, Ruapehu is more interesting.

FAQ
How long does it take to hike Mount Ruapehu?
It depends on where you start, whether the Sky Waka is running, how far you go, and what the conditions are doing. From the Whakapapa ski-field side, allow most of the day.
Is the route marked?
Not properly once you leave the ski-field area. You need to be comfortable navigating through open volcanic terrain without a tidy marked track.
Can you swim in Mount Ruapehu’s crater lake?
No. Older stories of people swimming there are part of a very different era. The lake is acidic, volcanically active, and DOC’s current volcanic risk advice says not to enter the area within 700 m of the lake centre while Ruapehu is at Volcanic Alert Level 1.
What is the best month to climb Mount Ruapehu?
Late summer is the simplest answer. February and March usually give you the best chance of less snow and more stable conditions, but the exact weather window matters more than the month.
Can beginners climb Ruapehu?
I would not make this your first serious alpine-style day hike. Fit beginners could enjoy the lower Whakapapa walks or the Sky Waka area, but pushing higher toward Dome Ridge is better suited to people who are confident off-track.
Final Thoughts
Ruapehu is a brilliant hike because it does not feel neatly packaged.
You start in a ski field, wander into raw volcanic terrain, lose the comfort of a marked trail, and suddenly feel very small on a very large mountain. I loved that.
But I would be more cautious with Ruapehu than with most New Zealand day hikes. Check the weather properly. Check DOC and GeoNet. Respect the maunga. Stay away from the crater lake area. And do not be embarrassed to turn around.
On the right day, it is magic.
On the wrong day, go somewhere else.
New Zealand Travel Planning Cheatsheet
🚑 Should I buy travel insurance for New Zealand?
100% YES! — New Zealand has “free” healthcare but it’s only for citizens. Tourists need travel insurance in case anything happens on your visit. Also be aware many policies won’t cover hiking as it’s a high risk activity! (that’s right, check the t&c’s on your complimentary credit card insurance)
I highly recommend World Nomads as you can get specific add-ons for the crazy activities you’re doing – and starts at just $7 a day!
🚙 Do you need to rent a car in New Zealand?
I’d reccommend it — Renting a car isn’t a necessity to get around in NZ with plenty of domestical flights and intercity busses. But, If you want to go on road trips or adventures outside of the major cities, you’ll need to rent a car. I always use Discover Cars for my rental bookings (it’s like Skyscanner for cars!) as they compare all availible providers for the best price.
Better yet, rent a van! This is the most cost effective way to see Aotearoa as you’re getting your transport and accomodation together as one! (Checkout my reccommended van rentals here)
📲 Will my phone work in New Zealand?
You’ll need to get a local SIM card when in New Zealand, which is super easy and doesn’t require ID. Spark generally has the best coverage and you can get pre-paid plans for around $30 for 30 days.
Alternativly – I now always use Airalo when travelling. This app generates an eSIM that will work the moment you touch down. It costs slightly more than a local SIM but the convenience is well worth it. You can signup here
💸How do you pay for thing in New Zealand?
Cash has gone out of fashion in New Zealand, so you’ll be able to pay for almost everything with EFTPOS / Debit / Credit Card. Paywave (contactless payments) is very common, but vendors who accept American Express cards are not (so bring a backup!).
I personally use Wise for all my international money needs as they only convert the funds when you may payment and offer a much better spread (margin on the true exhange rate) than the banks do. They also provide free deibit cards for your account!
🏩 What’s the best way to book my New Zealand accommodation?
My go-to for Kiwi hotels is Booking.com. For hostels, I use Hostel World. If you want a home-y feeling, check out AirBnB.. but don’t expect prices to be that much cheaper than hotels.
✈️ What’s the best site to buy flights to New Zealand?
For finding cheap flights, I recommend Skyscanner. Once you find the flight you’re looking for, I’d then suggest booking directly with the carrier (even if it costs a few $$ more than with one of the agreggators/agencies).
💧Can you drink the water in New Zealand?
Yes — everywhere in New Zealand you can drink the tap water. If you’re out hiking you can even drink the water from mountainous rivers and streams. I recommend a Brita Water Bottle and a packet of water purificiation tablets for long hikes and backcountry camping.
🎫 Do I need a visa for New Zealand?
NZ has a ‘traditional visa’ which is a document stamped in your passport allowing you to enter and stay in New Zealand for a specified period, while an “NZeTA” (New Zealand Electronic Travel Authority) is a travel authorization that allows certain passport holders to visit New Zealand without needing a separate visa – essentially a visa waiver for eligible travelers; meaning you need a full NZ visa if you don’t qualify for an NZeTA based on your passport and travel intentions.